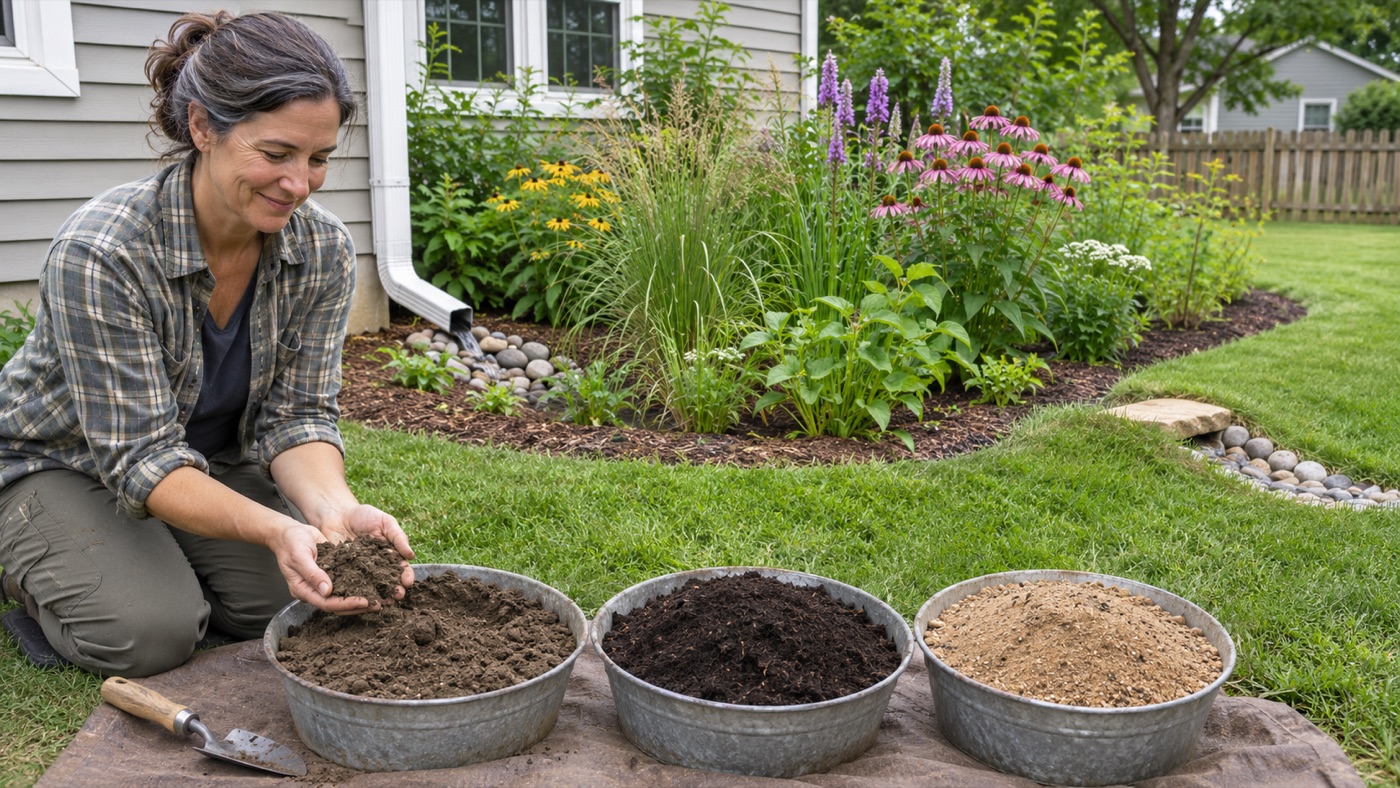
The best rain garden soil mix is not one universal recipe. If the soil already drains at the rate required by your local program, you may only need to protect it from compaction and blend a modest amount of finished compost into the planting layer. If the native soil drains too slowly—or the project is a regulated bioretention facility—you may need a tested engineered mix, an underdrain, a different location or professional design.
This guide explains how to choose a rain garden soil mix for a residential project, how deep the amended layer should be, how to test infiltration, and why simply adding a little sand to clay can create an unpredictable result. Use it as a planning framework, then follow the specification issued by your municipality, watershed district or local stormwater manual.
What a rain garden soil profile needs to do
A rain garden is both a planting bed and part of a drainage system. Its soil must support roots while receiving temporary pulses of runoff. A suitable profile needs to:
- accept water fast enough to meet the local drawdown requirement;
- hold enough moisture and nutrients for plants between storms;
- maintain pore space after construction instead of becoming compacted;
- filter sediment and some pollutants without clogging rapidly;
- resist erosion at the inlet and overflow; and
- work with the native subsoil, groundwater conditions and any approved underdrain.
Those goals compete with one another. A very sandy mix may drain quickly but dry out, lose nutrients and perform poorly as a planting medium. A mix with too many fine particles may support plants but drain too slowly. Excess compost can release nutrients, settle substantially or hold more water than intended. That is why engineered specifications normally control particle sizes and performance—not just the volume of three ingredients. Once the soil profile is set, use our guide to choose rain garden plants by moisture zone.
Native soil, amended soil or engineered soil mix?
| Approach | When it can fit | Main cautions |
|---|---|---|
| Protected native soil | The test at the proposed bottom elevation meets local infiltration and drawdown criteria, and the soil supports the selected plants. | Construction traffic can destroy the pore space that made the site suitable. |
| Native soil amended with compost | The site already drains adequately but the upper planting layer needs better structure or organic matter. | Compost does not cure a restrictive subsoil, high water table or compacted layer below the amendment. |
| Complete engineered rain-garden mix | Local rules require replacement media, the existing topsoil is unsuitable, or a designed filtration profile is being installed. | The mix must match the approved specification; labels such as “three-way mix” are not proof. |
| Engineered mix plus underdrain | Slow native soil or a filtration design requires controlled drainage to an approved outlet. | Underdrains add design, permitting and outlet requirements and may reduce infiltration. |
| Different location or drainage strategy | Groundwater, bedrock, contamination, septic systems, unstable slopes, foundations or very poor infiltration make the site unsuitable. | Replacing soil alone does not remove these site constraints. |
Start with the least disruptive option that meets local requirements. Oregon State University Extension notes that some agencies have moved away from automatic soil replacement after seeing poor plant establishment in overly sandy mixes. At the same time, regulated bioretention systems may require a precise imported medium. The project type and jurisdiction decide which approach applies.
Step 1: test the soil at the correct depth
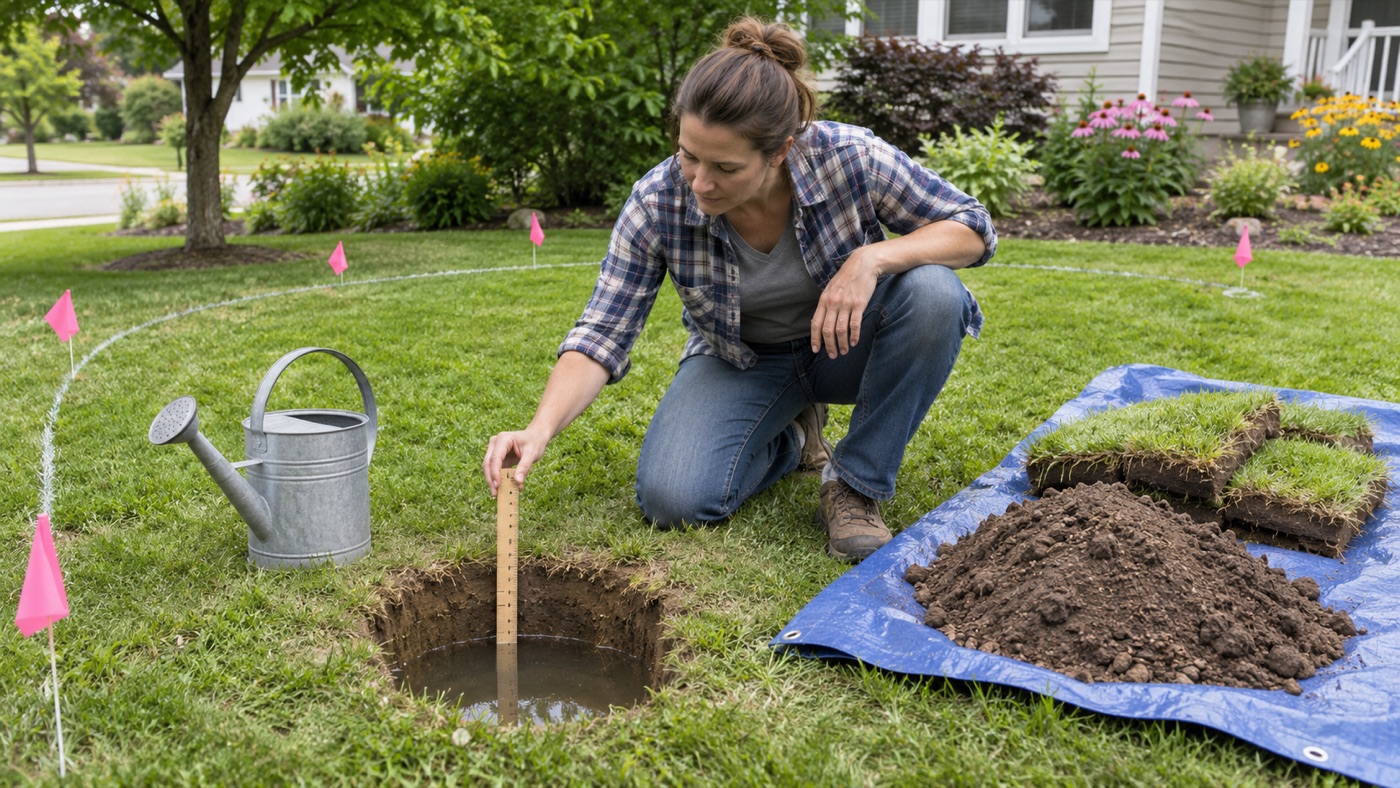
Do not test only the lawn surface. Remove sod and test at approximately the elevation that will become the rain garden bottom. A loose topsoil layer can hide compacted subsoil, construction fill or a restrictive clay horizon.
A basic homeowner screening test uses a straight-sided hole, a pre-soak and repeated water-level measurements. The exact hole size, pre-soak period and pass/fail threshold differ among reputable manuals. Wisconsin’s homeowner manual, for example, describes measuring the one-hour fall after pre-soaking. The Western Washington handbook uses repeated fills and calculates inches per hour from the final test. University of Minnesota uses a simpler 48-hour drainage screen.
- Check the local method first. Use the hole dimensions, saturation procedure and test season required by the authority.
- Dig to the planned bottom elevation. Avoid smearing the sides and bottom of the hole with a shovel.
- Pre-soak the soil. Dry soil can absorb the first filling unusually quickly and overstate long-term performance.
- Refill and measure. Record the starting water depth and the fall over the specified time.
- Repeat where required. Several tests reveal variability across a proposed basin.
- Compare with local criteria. Do not substitute another state’s threshold when your program publishes its own.
Published thresholds vary because climate, facility type, ponding depth, soil profile and design assumptions vary. Many technical programs use 0.5 inch per hour as a common screening minimum for infiltration practices, while some homeowner manuals allow a lower rate with a larger footprint or warn that standing water may last longer. Treat a result as an input to the local design method, not as a universal approval.
If you have not calculated the required footprint yet, use our guide to size a rain garden from drainage area, rainfall and ponding depth. Storage and infiltration must be evaluated together.
Step 2: identify the soil and the restriction
Texture and infiltration are related, but they are not the same measurement. A ribbon test can help screen whether soil is sandy, silty or clayey. An infiltration test measures how the actual profile accepts water under test conditions. Compaction, layering, roots, rock fragments, biological pores and antecedent moisture can make two soils with similar texture perform differently.
| Observation | Possible meaning | What to investigate |
|---|---|---|
| Water enters quickly at first, then nearly stops | Dry upper soil over a restrictive layer | Repeat after pre-soaking and inspect the full excavation depth. |
| Surface puddles but deeper soil is porous | Compacted turf layer or construction traffic | Determine whether shallow loosening and compost are allowed. |
| Hole remains wet even without recent rain | High groundwater, seepage or persistent saturation | Stop; changing the planting mix may not make infiltration safe. |
| Soil forms a long, strong ribbon | High clay content | Use the local test and sizing method; do not assume a small sand addition fixes it. |
| Soil drains extremely fast and plants dry out | Very coarse material with low water-holding capacity | Check whether an approved amendment or engineered medium is needed. |
A soil laboratory test can add texture, organic matter, pH, soluble salts and nutrient information. Ask the lab or Cooperative Extension office which package fits a stormwater planting bed. A standard lawn fertility recommendation does not evaluate hydraulic conductivity or prove that a rain garden will drain safely.
Step 3: decide whether the existing soil can stay
If the native soil passes the approved infiltration test and has adequate separation from groundwater, bedrock, utilities and sensitive features, preserving it may be the simplest option. Fence the area before excavation and keep vehicles, stockpiles and repeated foot traffic off the future basin.
Excavate from the sides where practical. Do not use the basin as a sediment trap while the rest of the property is under construction. Fine sediment can seal the surface and reduce infiltration before plants are installed. After excavation, lightly loosen a smeared or compacted surface only as the local detail permits.
Step 4: amend suitable native soil without overdoing it
Several homeowner manuals recommend working approximately 2 inches of finished compost or leaf humus into an existing soil that already has sufficient infiltration. Other regional guidance uses different depths. The aim is to improve the planting layer and soil structure—not to bury a failing subsoil beneath rich compost.
Use mature, stable compost from a reliable supplier. It should be free of trash, invasive plant material and obvious weed seeds. For a regulated project, compost may need to meet specified maturity, particle-size, carbon-to-nitrogen or nutrient limits.
Simple amendment-volume estimate:
Compost volume (cubic feet) = garden area (square feet) × compost depth (inches ÷ 12).
A 120-square-foot basin receiving a 2-inch layer needs:
120 × (2 ÷ 12) = 20 cubic feet, or about 0.74 cubic yard.
| Garden area | Compost at 1 inch | Compost at 2 inches | Compost at 3 inches |
|---|---|---|---|
| 75 ft² | 6.25 ft³ / 0.23 yd³ | 12.5 ft³ / 0.46 yd³ | 18.75 ft³ / 0.69 yd³ |
| 100 ft² | 8.33 ft³ / 0.31 yd³ | 16.67 ft³ / 0.62 yd³ | 25 ft³ / 0.93 yd³ |
| 150 ft² | 12.5 ft³ / 0.46 yd³ | 25 ft³ / 0.93 yd³ | 37.5 ft³ / 1.39 yd³ |
| 200 ft² | 16.67 ft³ / 0.62 yd³ | 33.33 ft³ / 1.23 yd³ | 50 ft³ / 1.85 yd³ |
These are loose-volume estimates before settlement and spillage. Confirm the amendment depth locally and avoid rototilling beneath existing tree canopies, where equipment can damage roots.
Can you add sand to clay soil?
Adding a small, unverified amount of sand to clay is not a dependable rain garden repair. The result depends on the sand gradation, clay content, mixing uniformity and final proportions. An incomplete mixture can remain dense, create contrasting layers or perform very differently from the intended engineered medium.
This does not mean sand is never used. Many approved bioretention mixes are predominantly carefully graded sand combined with controlled soil fines and compost. The difference is that the entire medium is designed and tested to meet a specification. It is not a few bags of play sand scattered over clay.
Step 5: buy an engineered rain garden soil mix when required
If the project requires replacement media, ask for documentation—not only a product name. “Topsoil,” “landscape mix,” “three-way mix” and “rain garden mix” are marketing descriptions unless they are tied to measurable specifications.
Provide the supplier with the exact local specification and request a recent test report or written confirmation for the delivered material. Useful checks can include:
- particle-size distribution or sieve analysis;
- percentage of mineral fines;
- organic matter by weight;
- compost quality and source;
- pH and soluble salts;
- hydraulic conductivity or infiltration performance;
- absence of contaminants and regulated weeds; and
- batch consistency and delivery ticket.
If a supplier cannot explain what the mix contains or which specification it meets, do not assume it will perform correctly. A cheap load that clogs, settles or kills plants can cost more to remove than the original installation.
How deep should rain garden soil be?
The answer depends on whether you are amending a planting layer, replacing soil, building a filtration facility or supporting large woody plants. Residential manuals show a wide range—from shallow compost incorporation to an 18-inch engineered layer or deeper filter bed. Tree roots may require much more soil volume than herbaceous perennials.
| Layer or action | Typical guidance you may encounter | Why it is not universal |
|---|---|---|
| Compost amendment | Approximately 2 inches incorporated into suitable existing soil in some homeowner manuals | Existing texture, organic matter, roots and local guidance differ. |
| Amended planting layer | Top 8–12 inches or more in some Extension guidance | Construction method and native soil performance control the depth. |
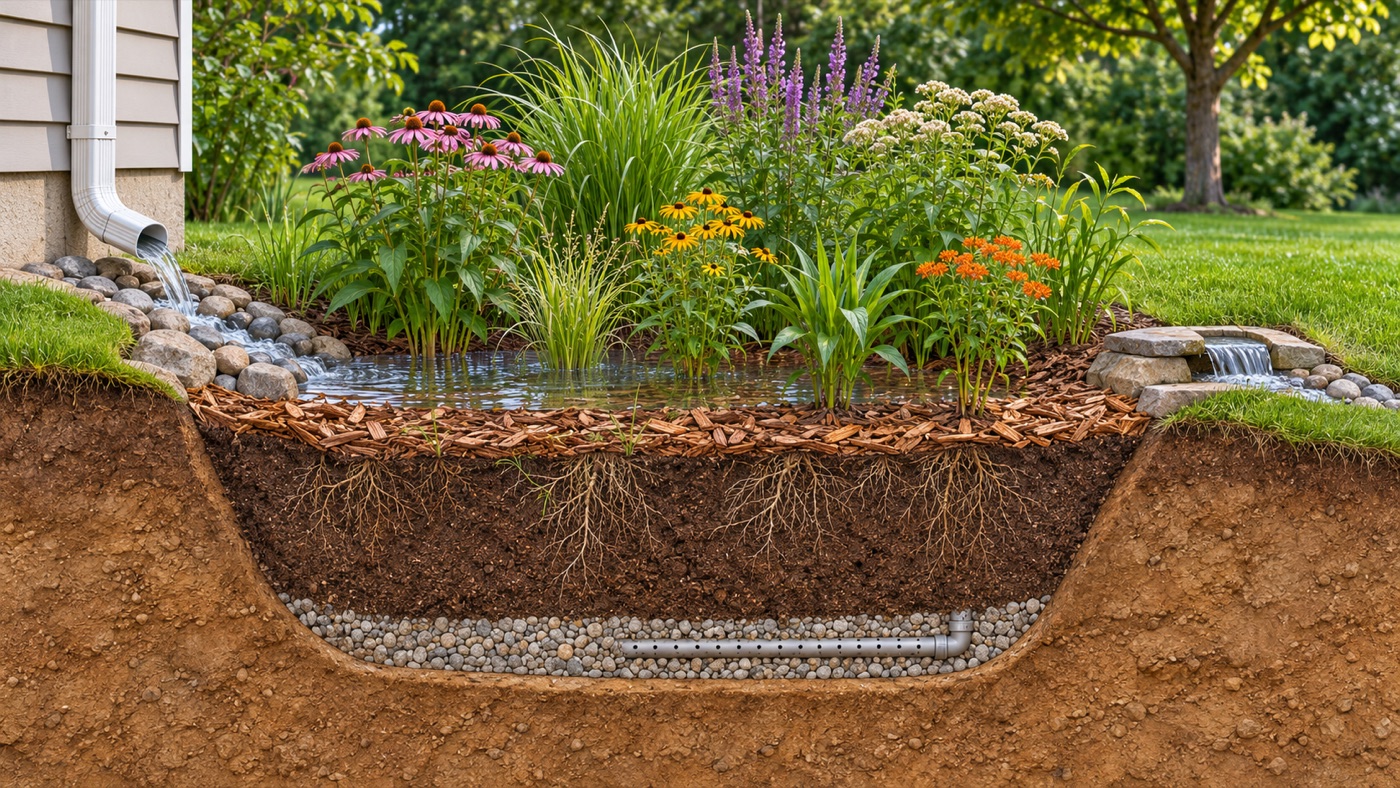
| Engineered soil replacement | Often around 18 inches in technical details, but specifications vary | Facility type, treatment goal, plants and underdrain design differ. |
| Tree rooting volume | May require much deeper or wider soil volume | A shallow filter bed may not support a mature tree safely. |
Do not confuse soil-media depth with ponding depth. Ponding depth is the temporary water-storage space above the finished soil surface and below the overflow. Excavation depth also includes the soil medium and any drainage layers.
How to calculate the quantity of replacement soil
For a level rectangular estimate:
Soil volume (cubic yards) = area (square feet) × media depth (feet) ÷ 27.
For a 150-square-foot rain garden with an 18-inch—or 1.5-foot—replacement layer:
150 × 1.5 ÷ 27 = 8.33 cubic yards.
Add only the allowance recommended by the designer or supplier for settlement and handling. Engineered media should normally be placed in controlled lifts without driving heavy equipment over the basin. Oregon State guidance describes loose lifts and watering to settle the material rather than aggressive mechanical compaction.
Mulch is part of the soil system
Mulch reduces erosion and weed pressure while plants establish, but it must remain in place during inundation. Fine, buoyant bark can float, pile against plants or wash through the overflow. Oregon State recommends coarse compost or arborist wood chips in frequently inundated areas and emphasizes dense vegetation as the long-term erosion control.
Avoid burying crowns and stems. Keep the inlet and overflow visible and inspect them after storms. Sediment accumulating at the inlet should be removed before it spreads across the basin and clogs the planting surface.
Construction mistakes that ruin a good soil mix
- Driving into the basin: equipment and repeated foot traffic compact the subsoil and imported media.
- Working wet soil: mixing or excavating saturated material destroys structure and creates clods.
- Smearing the bottom: a smooth shovel or bucket surface can reduce contact with the native soil.
- Leaving the excavation exposed: construction sediment can seal the bottom before media is placed.
- Creating abrupt layers: an unapproved texture change can perch water at the boundary.
- Overcompacting imported media: a mix that passed the supplier’s test may fail after installation.
- Using unverified topsoil: material may contain excessive clay, weed seeds, debris or salts.
- Forgetting the overflow: even perfect soil cannot absorb every storm immediately.
When an underdrain or another solution is safer
An underdrain is a perforated pipe in a designed drainage layer that carries filtered water to an approved outlet. It can help a facility drain where the native soil is slow, but it changes the system from a simple infiltration basin toward a designed filtration practice. Pipe elevation, cleanouts, aggregate, separation layers, outlet protection and permits matter.
Do not add a perforated pipe with nowhere lawful to discharge. Do not use a rain garden to intercept groundwater or move water away from a failing foundation. If the actual problem is subsurface seepage or water that needs conveyance, compare a rain garden vs. French drain and involve a qualified drainage or geotechnical professional where structures or slopes are at risk.
Post-installation test and first-storm check
Testing the native soil before construction does not prove the finished garden performs correctly. After installation and settlement, use the commissioning test required by the local program. Some specifications use a controlled ponding or falling-head test on the completed surface.
During the first several storms, check:
- whether water spreads across the basin instead of carving one channel;
- how long water remains after rainfall ends;
- whether sediment is accumulating at the inlet;
- whether mulch or soil moves toward the overflow;
- whether the berm settles or leaks;
- whether plants remain firmly rooted; and
- whether overflow follows the intended stable route.
Correct small erosion and sediment problems early. Persistent ponding, a failing berm, unexpected seepage or water moving toward a structure requires investigation rather than another layer of mulch.
Rain garden soil mix worksheet
| Question | Your result | Decision |
|---|---|---|
| Local rain-garden or bioretention standard found? | _____ | Attach the current specification before ordering soil. |
| Test depth and method | _____ | Confirm it represents the proposed basin bottom. |
| Measured infiltration rate or drawdown | _____ | Compare only with the applicable local threshold. |
| Groundwater, bedrock and setback screening complete? | _____ | Soil amendment cannot fix a prohibited site. |
| Native soil can remain? | Yes / No / Unsure | Use the least disruptive compliant approach. |
| Amendment type and depth | _____ | Calculate volume and protect nearby roots. |
| Engineered media specification | _____ | Request supplier documentation for the delivered batch. |
| Media volume and settlement allowance | _____ yd³ | Confirm with plans and supplier. |
| Approved underdrain and outlet, if any | _____ | Verify design, permits and maintenance access. |
| Post-construction test | _____ | Commission the finished garden before relying on it. |
Frequently asked questions
What is the best soil mix for a rain garden?
The best mix is the one that meets the local hydraulic and planting specification for the site. Suitable native soil may need only protection and modest compost amendment. Slow or unsuitable soil may require a tested engineered medium, underdrain, different location or professional design.
Can I use regular garden soil or bagged topsoil?
Not without verifying its properties. Generic products can contain too many fines, excessive organic matter, salts, debris or weed seeds. A label does not prove the product meets a rain-garden specification.
How much compost should I add?
Some homeowner manuals recommend incorporating approximately 2 inches into existing soil that already drains adequately; other programs use different depths or engineered media. Follow the local detail and avoid assuming that more compost is always better.
Will adding sand make clay drain?
A small, improvised sand addition is unreliable. Approved engineered mixes can contain a high proportion of carefully graded sand, but the complete mixture and performance are controlled. Use the local specification rather than guessing.
Should landscape fabric separate the soil from gravel?
Do not add fabric unless the approved detail specifies it. Some systems use a graded aggregate transition or other designed separation, while unsuitable fabric can clog. An underdrained profile should follow a complete local or engineered drawing.
How long should a rain garden hold water?
Requirements vary. Reputable homeowner and technical guidance commonly uses drawdown targets between roughly 12 and 48 hours, but some systems require faster drainage. Use the governing local criterion and investigate water that persists longer than designed.
Sources and further reading
- U.S. EPA: Bioretention (Rain Gardens) Stormwater BMP
- Oregon State University Extension: Rain Gardens—Low-Impact Development
- Oregon State University Extension: Choose the Right Rain Garden
- University of Maryland Extension: Rain Gardens
- University of Maryland Extension: Watershed Stewards Academy Rainscaping Manual
- Wisconsin DNR: Rain Garden Manual for Homeowners
- University of Minnesota Extension: Building a Rain Garden
- Washington State University Extension: Rain Garden Handbook for Western Washington Homeowners
Last reviewed: November 9, 2026. This article provides general homeowner planning information, not a site-specific engineering design. Confirm soil-media specifications, infiltration testing, groundwater and bedrock separation, setbacks, utilities, drainage rights, permits, underdrain outlets and post-construction testing with the applicable local authority and qualified professionals.